
How to do ... christmas nails!
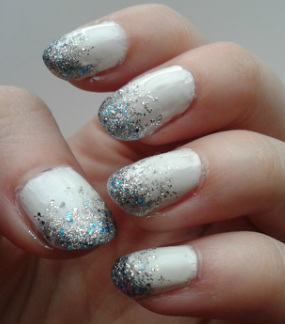
I couldn't wait for the Christmas season to come along, so I could try out a whole new lot of designs for my nails! The first design I came up with was this wintry frosted glitter gradient manicure! For this look you will need a few different silver glitter nail polishes, ranging from thin to thick. This is to build up the gradient on your tips. See below how I created my look. :)
|

|
Nail polishes used: Barry M Nail Paint in White
Glittery Nail Art Polish in Silver
Barry M Nail Paint in Diamond Glitter
Sally Hansen Gem Crush in Showgirl Chic
Glittery Nail Art Polish in Silver
Barry M Nail Paint in Diamond Glitter
Sally Hansen Gem Crush in Showgirl Chic
And ... begin!
|
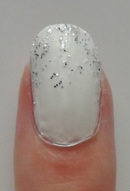
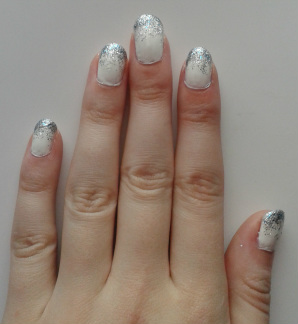
Step 1. Choose a light base colour for your nail. I chose tp use Barry M Nail Paint in white but you can use anything from blues to pinks - whichever you prefer! A couple of coats may be needed to get a smooth, even looking colour. |

|
|
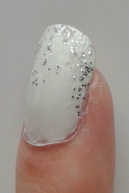
Step 2. Now you will need a thin (not gloopy) silvery glitter nail polish. I went for a nail art polish as the brush is skinny and easy to use. With this, paint light strokes about half way down your nail, making sure that you paint longer strokes at the edges, to get that icicle frosted effect!
|
|
|
Step 3. Now you can choose to go over it with a thicker polish if you want to get more of a gradient. I used Barry M Nail Paint in Diamond Glitter. I'd say that this nail paint is more of a finishing touch top coat however as it's not really thick enough to warrant being used as a base colour. It adds more of a sparkling touch, rather than being used as a proper polish. You can't really notice the sparkle in this step, which is why I wasn't able to provide a picture :o
So ... onto the final step!
So ... onto the final step!
|
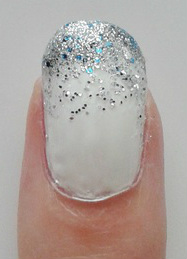
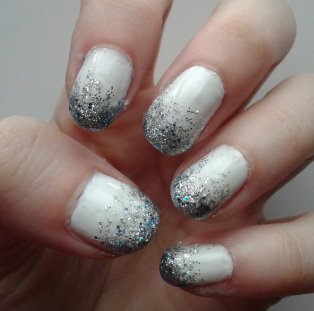
Step 4. For the final step, you will need your thickest Silver Glittery Nail Polish. I chose Sally Hansens Gem Crush in Showgirl Chic (see review HERE) as it has a variety of silvers and blues in it.
With this, you will need to focus on the tip of your nail. Using the tip of the brush, carefully dab around the top of your nail lightly aiming downwards - but not too much as you don't want to cover the gradient glitter you created earlier. |
|
Once completed, you should end up with something like the picture above. In this step you are basically just creating a sort of french tip manicure - except with glitter!
Finish this off with a top coat and you're done!
Finish this off with a top coat and you're done!
|
|
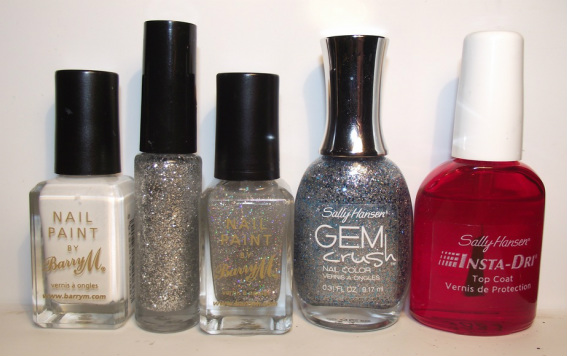
(L,R) Barry M Nail Paint in White, Silvery Glitter Nail Art Polish, Barry M Nail Paint in Diamond Glitter, Sally Hansen Gem Crush in Showgirl Chic, Sally Hansen Insta-Dri Top Coat
Thank you very much for reading this tutorial!
I hope it inspires you to create your own gradient glitter nails. :)
Please feel free to leave any suggestions and comments below :)
HTML Comment Box is loading comments...
